Saturday, April 16, 2016

Cave update and new shaders

 I saw that blogger likes to tonemap stuff I upload, so I tried brightening things up a bit. For this update, I swapped out a lot of temp textures. the new ones were made using Bitmap2Material, and I plan on doing research into substance painter next. I added in an animated caustics light and did some nicer set dressing for this particular composition.

I also did some research on fancy shaders! The one below is Parallax occlusion mapping- emulating higher poly surfaces with a single plane and a complicated shader network;
 And some vertex blending between two textures. Oh, I tried reproducing the MGS5 chamfered corner technique, but since I dont know how to script, I did it manually in Maya. I think it worked out well, but I implemented it poorly on that brick fence.
More tools to use in future projects! I'm gearing up for a new one. I just have to decide on subject matter

Sunday, March 27, 2016

cave update

I made a few more assets, plus a vertex paint texture that blends between jagged rocks and drippy rocks.

Sunday, March 13, 2016

Cave Props


Lately, I've been inspired to try and come up with  some modular cave assets. I did some research into basic stalactite/stalagmite shapes; where they happen and how they can compound onto each other. I was also interested in the interplay between dry rocky textures and wet drippy textures, but I'll have to look into more of that later. My goal for this was to create as few props as possible to replicate this complex growth in old limestone caves. I'm hoping to create a few more pieces ( with nicer details) in the weeks to come.
On another note, this is the first time I've exported zbrush obj's and baked the details to a  lower res mesh! Lucky for me, stalactites are pretty goopy already, so it was the perfect sculpting project for my skill level. The grey assets on the right hand side are basic maya geo ( my proof of concept phase)

Sunday, January 3, 2016

A Weekend with Marvelous Designer

I had alot of fun with my first foray into Marvelous Designer- a digital clothing maker. It was very forgiving, allowing me to adjust patterns on the fly when they didn't fit like I wanted. Our model today is Bazt, who's sporting the same clothes as he had before ( except the old ones were box-modeled). I think the hardest part will be exporting it and making it usable for animation because it creates alot of issues with n-gons and impossible geo once it exports. I have alot more experimentation and practice ahead of me ( next time I'll have to use a real pattern too)

Monday, November 2, 2015

apartment update

Just a quick printscreen dump to show off where my loft apartment is at. Most recently, Ive been playing with transparencies; trying to balance beautiful refraction with..not looking through 4 transparent materials in one object. I was also playing with post processing effects. I'd LOVE to do a huge polish pass, and maybe make this place more lived in, but who knows if/when that'll happen.


Sunday, August 23, 2015

UE4 Kitchen


I've been trying to familiarize myself with Unreal Engine 4. eventually, this will be a beautiful polished kitchen with tones of pretty assets and lighting...

Thursday, April 9, 2015

Spherically-projected perspective in photoshop

who's ready for some ultra-boring perspective stuff? I am!
I wasn't satisfied with pinched coordinates at the poles of spheres- that and the incredibly warped perspective led me to come up with other solutions, like adding a cap for overhead clouds, or just leaving the top of the sphere a generic wash of colour.
The other day, i figured out how to paint to your hearts content, with way less perspective distortion.
Let's use the polar coordinates filter in photoshop!

An example of the kind of perspective we'll be making. notice the huge warping going on at the top and bottom.

We’ll skip ahead and assume you've already got a 4 point perspective drawing. This would wrap onto a sphere well, but there would be gross pinching at the top. What if you wanted to continue your drawing all the way to the top of the sphere this was getting mapped onto?
I'll be using a square canvas for this demo. The grid measures out every 45 degrees

For the tops, I've found its easier, and more sane to make another painting for the top (and bottom if need be). I started here with a 5 point perspective drawing of my top pole ( imagine fluffy clouds and happy trees and stuff)

the grey border will match up with the 45 degree longitude line in the other drawing


You can mark out a smaller circle (like I've done in grey) that cuts into the radius by half. this is the 45 degree mark, where you’ll be cropping later. Making sure your perspective drawing is perfectly centered, you can run it through a filter called ‘polar coordinates. use the ‘polar to rectangular’ option;


I’m still getting used to polar coordinates myself. Basically, it cuts your drawing halfway through and stretches it around a virtual sphere. It will get un-stretched when we map it onto real geo in maya. All you have to do then is shrink it vertically and sew it up with your other drawing:

See the nasty stretching happening at the top? that means its working!
To test our results, here it is mapped onto a sphere. Ive also included a generic looking texture to show something other than a grid;


Glorious.


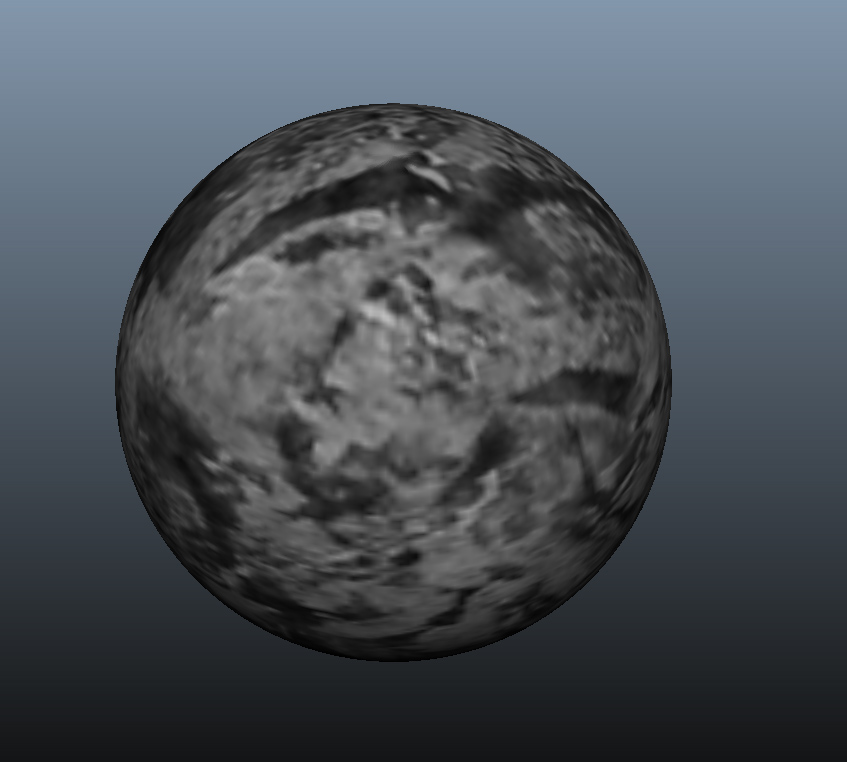
This was just a photo I used the same technique on .


Magnifique! I hope this comes in useful to anyone doing skyboxes/ matte paintings and such.